
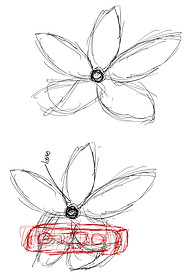
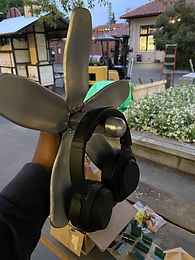
Wallflower
The Wallflower is a wall-mounted headphone stand. I took inspiration from the jasmine flower when creating this, especially because my middle name is Jasmine! This was created using the processes of sand casting, turning on the lathe, milling, and sheet metal forming.
Initial Project Ideas

Ramen Rack

SugarCane Footstool

Laptop Lift-up
For this project, I narrowed down to these three pieces. I ended up combining and blending aspects of them into something new, the Wallflower. I took the flower, specifically Jasmine, inspiration from the Ramen Rack and the headphone stand from the Laptop Lift-Up to get to this idea.
Ideating and Revising


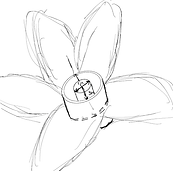
Sketching was very important with this. When the idea came into my mind, sketching was the only way to initially convey it to the people around me and I found it really difficult as it was really organic. For details, I found that CAD was the place to include them, but the sketches also played such a large role in thinking about assembly as I initially planned on welding the piece together.


My CAD abilities vastly expanded through this process as I learned about forms and meshes to create organic shapes like the petals and leaves. On top of that I learned about other tools that were really important in the success of the piece.


Processes
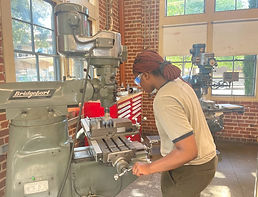

Milling and Threading
With the center piece, I milled a plethora of holes and tapped them to create threads so that it could be the central attachment piece. The positioning of the holes and the petals, as well as the fixturing, was the difficult part of this. But after the first few it was a matter of repetition.

Sheet Metal Forming
For the leaves, I water jetted the intial shape of the leaves and then used a sheet metal roller to get a curve to them. I then drill pressed two holes at the bottom for attachment to the central piece and one at the top where I press fit a piece that would be used for wiring.
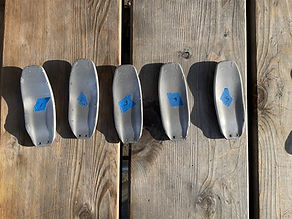

Sand Casting
The petals, a very critical piece, were made in the most unpredictable process. I ran into challenges due to its abstract shape which resulted in the need for a follow block. The clay follow block I initially tried ended up breaking so 3D printing it was the alternative which was really effective! Designing the petals on CAD was also difficult, but the design ended up being really important to the assembly.

Turning on Lathe
For the pistil, I used the external and external radii tool to create the rounded tip as well as the indent for the headphones to rest. I found the radii tool to be really difficult in the beginning, but after accepting its imprecise nature and practice I ended up being able to use it pretty well.
Assembly and Result


The assembly of the piece really hinged on the central disk that I threaded on the mill. Each petal had two holes drilled through that aligned with two holes on the disk where they would be screwed together, and the same for the leaves. My placement for some of the petals resulted in a need for sanding the sides or widening the holes for clearance, but overall the assembly was smooth sailing as I got to see all the work I'd done align and fit together.

Takeaways
-
The importance of planning ahead and in depth cannot be overstated because knowing which steps need to be adjusted with a change in the overall project makes everything easier.
-
Take time for yourself when doing a project because latent progress is being made
-
Engineering and the intersection with art is something I really want to explore!